Posts

Showing posts from March, 2022

Choosing a Sound

Image
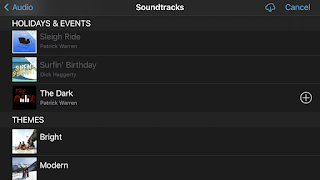
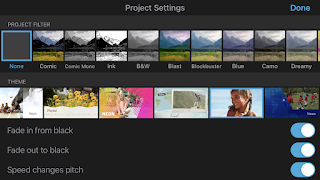
When it came to choosing music and sound effects my group decided it would be best to either use YouTube or iMovie. Though I could have tried get permission to use music that is usually copyrighted, my group decided against this because it would likely take a long wait. Also, the music my group needed for the clips was very find. After deciding on this my group then chose between YouTube and iMovie to use music from. YouTube has a large array of copyright free music. However, the music, jingles, and sound effects are included with iMovie on a royalty free basis. Also, it is much more efficient to use the iMovie option especially because my group is using iMovie to edit. Due to this my group decided to go with the iMovie option. I then spent a while looking through all of the music options iMovie provides. There are many choices but I was specifically looking for music that had a somewhat suspenseful feeling to it. Though my genre is sci-fi, my group was trying to give a suspenseful moo

Editing Blog: Making Progress

Image
With the first twelve scenes being finished, my group decided to work on the rest of the scenes next. This would take my group a while to complete because there were eighteen scenes left to be edited in. However, because all the clips I needed were moved into one area I didn't have much of a problem with finding them. Since I was using iMovie, I did the main editing parts while my group members was with me to discuss each members opinions on the editing choices. This was because I couldn't exactly share the files in a way that would allow my group to work on it while I was. Unfortunately, this meant I couldn't save much time. Though, the end result this way would be better since my group could still work on it together, except I was the one using the physical software. My group discussed aspects to the editing like filters, sound effects, and voice overs. These things were important because if they were agreed upon, they could increase the quality of the film. For now my gr

Editing Blog: Setting Up

Image
Now that my group is finished with filming I started to edit. My group decided on an editing software. This did not take long since each group member has a little bit of experience with editing software due to previous projects. I shortly visited the idea of some free services that would allow me to mainly use my laptop. However, after entertaining the idea in a group discussion, I then decided against it because it would limit the overall ability of my group to move clips and sounds across platforms. Instead I decided it would be the best choice to use iMovie as my groups editing software for this film. This is because all group members are able to use it and I have a little bit of past experience using the software. Before I started to edit, my group members and I gathered all of the scenes filmed into one folder. I was able to do this pretty easily because my group members sent the already filmed scenes into a group chat I made through iMessage. To make moving the clips into iMovie

Filming Blog: Reshoot

Image
After reviewing all scenes that were filmed by my group, I decided my group had to reshoot the base scenes. Though the quality wasn't initially a problem, once I was able to see the base and park scenes in one spot I saw how much they differed in quality. I then showed my group and discussed the next decision. Though this was a let down since my group has to entirely reshoot the base scenes, it is the best way to make sure the quality of the film doesn't suffer. My group then decided to film at a group member's house again but would make sure there weren't any problems with the shots. To make sure the shots were good I had some shots from the park open on my phone and compared them to the new base shots. By doing this I could make sure the new shots would definitely work when I start editing. To make these shots better while filming I was able to use a lamp a shined it in the direction of the setting for the base shots. My group also needed to incorporate some sort of r

Filming Blog: Park Scenes

Image
To complete the rest of the filming my group met at Easterlin Park. The remaining scenes my group had to film were scenes 1-30 but excluding scenes  7, 8, 13, 14, 15, 22, 23, 24, 28, 29, and 30. My group initially planned to work on 10 of these remaining scenes per day, but recently decided against it.   This is because if I filmed my scenes on different days it may be to difficult to align the scenes and make them work properly for the overall film. When aligning scenes for my film I have to think about things like weather, light, and how the actors appear on camera. If half the park scenes appear sunny and dry, but the next day it rains it would be almost impossible to properly align the scenes when I eventually start editing. It is because of this that i nstead, my group filmed the last 19 scenes in one visit.  At first I was the only group member who really wanted to only do 10 scenes and 9 scenes on two separate  days. I thought it would be more manageable to film this way instead

Filming Blog: Base Scenes

Image
For my group's first filming day I planned to get the scenes for my film that involves the character known as base. The scenes that base is in are 7, 8, 13, 14, 15, 22, 23, 24, 28, 29, and 30. To complete these scenes my group met up at a group member's house. My group would also need access to have access to any type of computer, multiple sheets of paper, a desk, and operator like clothing and gear. When my group initially put together an outline for the decided plan, there was a clear idea made of what was needed to be completed.  However, even though a clear plan was created my group ran into a couple issues. For example, my group of four needed to film multiple scenes in another group member's house. This became an issue because my group member's family was home during our filming process. This was only problematic because my group had to deal with not filming background sounds. Also, my group found that it was very difficult to film these scenes in a small room, wh

Storyboard for Final Task

Image
  Scene 1: An establishing shot of the forest and surrounding area, panning from left to right. Scene 2: Close-ups on pieces of scenery, shown in close sequence. This will last from five to seven seconds. Scene 3: Close ups of scientific equipment on the forest floor. This will last for approximately five seconds. Scene 4: Long or wide shot of actors working through the forest, panning to follow as they walk, will last for about seven seconds. Scene 5: Medium long shot- filmed on eye level- of the actors speaking. This will last approximately ten seconds. Scene 6: High angle medium shot of equipment being set up. This will last for about seven seconds. Scene 7: Medium shot of a man at a computer with papers around him, filmed at eye level. This will last for around ten seconds as dialogue takes place. Scene 8: A close up shot of the man’s computer, possibly filmed as a POV or over-the-shoulder shot. This will last for around five seconds. Scene 9: An extreme close up of a bag of soil b